Recently, my home experienced a power outage. My Synology NAS shut down gracefully since it was connected to a UPS, but my Linux server, which wasn’t connected to the UPS, suffered a hard power loss. This can easily lead to data loss or, in severe cases, disk damage! That’s why I finally got around to configuring NUT, which I had been putting off for a while. This article shares how to use NUT to protect multiple devices with a single UPS.
Device Setup
Synology NAS: Running DSM 7.2
Linux Server: Running AlmaLinux 8.1
Schneider APC UPS: Directly connected to the Synology NAS
What is NUT?
To implement this functionality, we need NUT (Network UPS Tools). NUT is an open-source toolkit for monitoring and managing UPS devices, allowing multiple computers to share UPS status information over a network.
Key components include:
| Component | Function |
|---|---|
| nut-driver | Communicates with the physical UPS |
| upsd | Exposes UPS status to the network; upsmon can retrieve status from this |
| upsmon | Primary mode can control shutdown, secondary mode only monitors |
| upssched | Used for delayed shutdown or timeout determination |
| scripts | Handle status changes, such as sending notifications |
How it works:
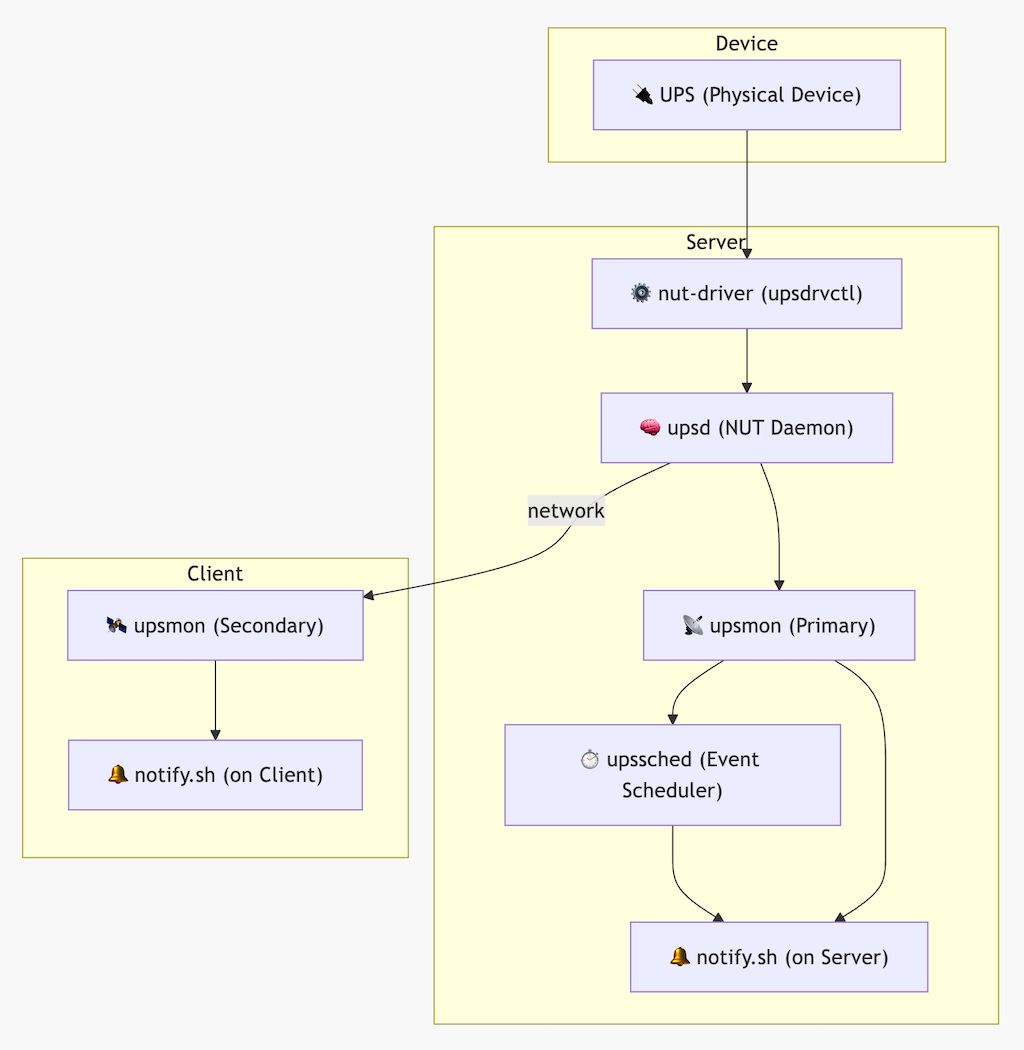
In this setup, the Synology NAS will act as the primary server, while the Linux server will act as a secondary client.
When mains power is lost, the Linux server can receive power outage information from the upsd service on the Synology NAS, start a countdown to shutdown, and send notifications through scripts (in this case, I’ve configured WeChat Work notifications).
Configuring the Synology NAS UPS Network Server
- Log into the Synology DSM management interface
- Open “Control Panel” > “Hardware & Power” > “UPS”
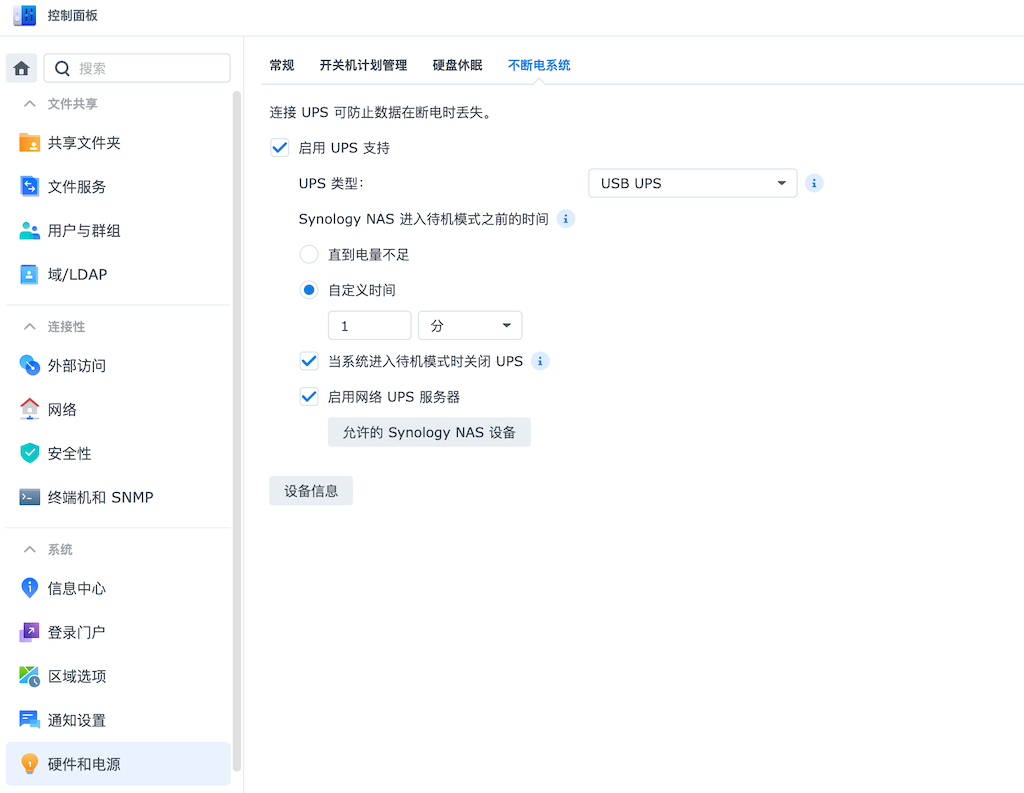
- Make sure “Enable UPS support” is checked
- Select “USB” in the “UPS type” option (depending on your UPS connection method)
- Set custom time or until low battery (if your UPS battery is unreliable, I recommend setting a shorter time)
- Check Turn off the UPS when the system enters hibernation mode; otherwise, the system will only enter hibernation mode after a power outage and won’t actively shut down
- Scroll down to the “Enable UPS network server” option and check it
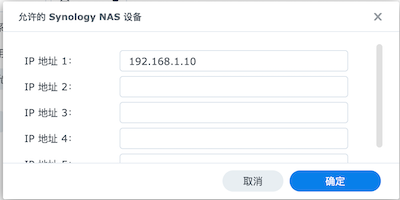
- Add your Linux server IP address under “Permitted UPS devices”
- Click “Apply” to save the settings
With this, the Synology configuration is complete.
If you want the system to restart automatically after power is restored, go to “Control Panel” > “Hardware & Power” > “General” and check Restart automatically after a power failure is restored.
Installing and Configuring NUT on the Linux Server
- First, install the NUT client package:
sudo yum install nut
The current version I installed is 2.8.2 (you can check with upsd -V)
- Edit the NUT main configuration file:
sudo vi /etc/ups/nut.conf
Set the mode to netclient:
MODE=netclient
Here are the possible MODE values for reference:
Value Explanation standalone Local UPS connected to this machine, all components (upsdrv, upsd, upsmon) run locally. Used for single machine local UPS management. netserver Local UPS connected to this machine, runs upsd, allows other network clients to connect via NUT protocol. Commonly used in Synology setups as a UPS master server. netclient No UPS connected to this machine, only connects to a remote UPS host (running upsd). This machine only runs upsmon. This is the most common mode for secondary machines.
- Edit the monitoring configuration:
sudo vi /etc/ups/upsmon.conf
Add the following line:
MONITOR [email protected] 1 monuser secret secondary
The MONITOR configuration format is as follows:
MONITOR (“primary”|“secondary”)
Parameter Explanation MONITOR Fixed keyword indicating this line is a UPS monitoring configuration. system UPS name and host address: here it refers to a UPS instance named “ups” running on remote host 192.168.1.7. powervalue Indicates the “power redundancy level” of this UPS — it’s one of several UPS systems we rely on. If you have multiple UPS units, set this number for MINSUPPLIES determination (how many power supplies the system needs at minimum to consider itself safe). Usually set to 1. username Username for connecting to the remote upsd service. This user must be defined in /etc/nut/upsd.users on the remote host with MONITOR permissions. password Password for monuser, corresponding to the password configured in upsd.users. (“primary”/“secondary”) Role type: secondary indicates this is a subordinate client that won’t initiate shutdown on its own, but will wait for master notification or monitor events to shut down itself. Common roles are primary (master) and secondary (subordinate).
The default UPS name for Synology is “ups”, 192.168.1.7 is the Synology IP, and the default username and password are monuser and secret. There’s also a way to check the username and password in the troubleshooting section below.
Test if the configuration is correct.
You can start it in DEBUG mode to see if it works properly.
sudo /usr/sbin/upsmon -DIf everything is normal, you should see output similar to this:
Network UPS Tools upsmon 2.8.2
   0.000000     fopen /run/nut/upsmon.pid: No such file or directory
   0.000026     Could not find PID file to see if previous upsmon instance is already running!
   0.000080     UPS: [email protected] (secondary) (power value 1)
   0.000139     Using power down flag file /etc/killpower
   0.000267     [D1] debug level is '1'
   0.000615     [D1] Saving PID 1141184 into /run/nut/upsmon.pid
   0.001801     [D1] Succeeded to become_user(nut): now UID=57 GID=57
Init SSL without certificate database
   0.020004     upsnotify: failed to notify about state 2: no notification tech defined, will not spam more about it
   0.020009     [D1] Trying to connect to UPS [[email protected]]
   0.021112     [D1] Logged into UPS [email protected]
Next, use the
upsccommand to check the UPS status.upsc [email protected]It will return information about the UPS such as battery level, version, etc.
Init SSL without certificate database
battery.charge: 100
battery.charge.low: 10
battery.mfr.date: 2001/01/01
battery.runtime: 868
battery.runtime.low: 120
battery.type: PbAc
battery.voltage: 13.7
battery.voltage.nominal: 12.0
device.mfr: American Power Conversion
device.model: Back-UPS BK650M2-CH
device.serial: 9Bxxxxxx
device.type: ups
driver.name: usbhid-ups
driver.parameter.pollfreq: 30
driver.parameter.pollinterval: 5
driver.parameter.port: auto
driver.parameter.synchronous: no
driver.version: DSM7-2-1
driver.version.data: APC HID 0.96
driver.version.internal: 0.41
input.sensitivity: low
input.transfer.high: 278
input.transfer.low: 160
input.voltage: 224.0
input.voltage.nominal: 220
ups.beeper.status: enabled
ups.delay.shutdown: 20
ups.firmware: 294803G -292804G
ups.load: 30
ups.mfr: American Power Conversion
ups.mfr.date: 2022/10/25
ups.model: Back-UPS BK650M2-CH
ups.productid: 0002
ups.realpower.nominal: 390
ups.serial: 9B2xxxxxxx
ups.status: OL
ups.test.result: Done and passed
ups.timer.reboot: 0
ups.timer.shutdown: -1
ups.vendorid: 051d
Start and enable the NUT service:
sudo systemctl enable nut-monitor
sudo systemctl start nut-monitor
Notifications to WeChat Work
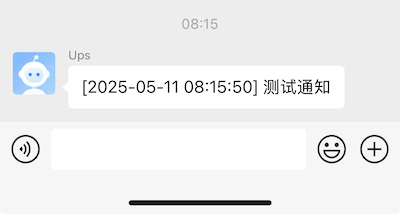
Finally, I wrote a script on the Linux server to notify WeChat Work of UPS events.
- Create a notification script on the Linux server:
sudo vi /etc/ups/notify.sh
- Add the following content (remember to replace
YOUR_KEYwith your WeChat Work robot key):
#!/bin/bash

WEBHOOK_URL="https://qyapi.weixin.qq.com/cgi-bin/webhook/send?key=YOUR_KEY"

# Get event message
EVENT_MSG="$1"

# Get current time (format: 2025-05-10 18:30:12)
TIMESTAMP=$(date "+%F %T")

# Construct complete push content
MSG="[$TIMESTAMP] $EVENT_MSG"

# Send message to WeChat Work
curl -s -X POST "${WEBHOOK_URL}" \
  -H 'Content-Type: application/json' \
  -d "{
        \"msgtype\": \"text\",
        \"text\": {
            \"content\": \"${MSG}\"
        }
      }" >/dev/null 2>&1
- Add execution permissions:
sudo chmod +x /etc/ups/notify.sh
- Test the script:
/etc/ups/notify.sh Test notification
- Edit the upsmon configuration file:
sudo vi /etc/ups/upsmon.conf
Add the NOTIFYCMD directive pointing to your script:
NOTIFYCMD /etc/ups/notify.sh
Enable the events you want to be notified about in upsmon.conf, for example:
NOTIFYFLAG ONLINE       SYSLOG+EXEC
NOTIFYFLAG ONBATT       SYSLOG+EXEC
NOTIFYFLAG LOWBATT      SYSLOG+EXEC
NOTIFYFLAG FSD          SYSLOG+EXEC
NOTIFYFLAG COMMOK       SYSLOG+EXEC
NOTIFYFLAG COMMBAD      SYSLOG+EXEC
NOTIFYFLAG SHUTDOWN     SYSLOG+EXEC
NOTIFYFLAG REPLBATT     SYSLOG+EXEC
NOTIFYFLAG NOCOMM       SYSLOG+EXEC
NOTIFYFLAG NOPARENT     SYSLOG+EXEC
NOTIFYFLAG CAL          SYSLOG+EXEC
NOTIFYFLAG NOTCAL       SYSLOG+EXEC
NOTIFYFLAG OFF          SYSLOG+EXEC
NOTIFYFLAG NOTOFF       SYSLOG+EXEC
NOTIFYFLAG BYPASS       SYSLOG+EXEC
NOTIFYFLAG NOTBYPASS    SYSLOG+EXEC
- Restart the nut-monitor service:
sudo systemctl restart nut-monitor
Now, when the UPS status changes, such as when mains power is lost or restored, you will receive notifications on WeChat Work.
Power Outage Test
After everything is configured, you can test by disconnecting the UPS power.
If you have the Synology web interface open, you’ll notice that after the configured time, it will stop services and enter safe mode.
Then, the Linux server will shut down. If you’re connected via SSH at this time, you’ll see:

This indicates that our configuration is working properly.
Troubleshooting
- How to view log files
If you encounter issues, you can check these log files:
- On Linux:
/var/log/messagesorjournalctl -u nut-monitor - On Synology: Control Panel > Log Center > System Logs
- How to view Synology UPS configuration and password
Synology UPS configuration requires SSH access to the Synology backend.
/etc/ups/ups.conf: View UPS name and configuration, such as:
[ups]   # << name
        driver = usbhid-ups # << driver
        port = auto
/etc/ups/upsd.users: View users and passwords, such as:
[monuser] # << user
                password = secret # << password
                upsmon master
You can also modify this password, but after modification, you need to restart the upsd service using the following command:
synosystemctl restart ups-usb
- If your Synology has a firewall enabled, remember to allow port 3493.
- If you find that your Synology doesn’t shut down properly, but only enters hibernation mode, you can refer to “Synology UPS Automatic Shutdown Settings for Power Outages” to modify the shutdown command.
Conclusion
With this setup, I can now ensure that whenever a power outage occurs, both my Synology NAS and Linux server can safely shut down, avoiding data corruption and filesystem issues~